The CAMELot Cellular Automata Programming Environment
Contact Details
CNR-ICAR
nstitute
of High Performance Computing And NetwoRking
Via Pietro Bucci cubo 41C
87036 Rende, CS, Italy, Europe.
|
CAMELot sample session (doc version) Starting CAMELotAssuming the current working directory is the top directory of the CAMELot binary distribution, CAMELot is invoked from a UNIX shell using the command: platform/camelot [X options] [filename] Where platform is the platform identifier (the supported platforms are sunos5, linux, irix6 and tru64); filename is a CARPET source file; and X options are the standard X application command line flags (-display,-geometry,-iconic,-fn etc). These command line arguments are optional. The CAMELot Development Window appears on the screen. It consists of three sections: · A Menu Bar; · An Editor subwindow with a scroll bar in each direction; · A three-Button bar. Editing a programA user may write a program using the editor window. Alternatively, they may open a previously saved program file using the Open option of the File menu. After any modifications the file must be saved using the Save or Save As option of the File menu; if a filename has been provided, this is done automatically when pressing the Compile button. Program editing is facilitated with the use of the Cut, Copy and Paste Options of the Edit menu. Shortcuts are available for all these functions.
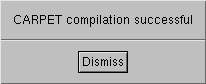
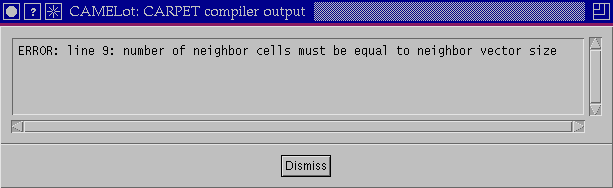
Figure 1: The Development Window Program CompilationWhen the program is ready, the user may compile it by clicking the Compile button. A successful compilation is followed by a pop-up window dismissible by clicking its Dismiss button. An erroneous compilation causes a beep and a pop-up window provides information about the error.
Figure 2: Successful Compilation Pop-Up Window
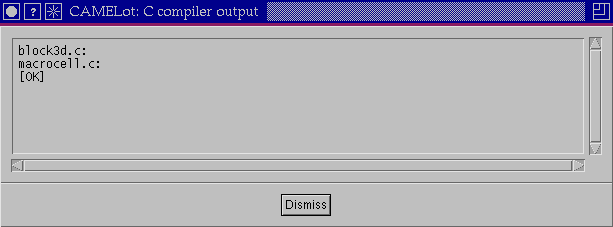
Building a ProgramThe Build operation generates a Unix executable file for CA execution. In order to build a file the user must first set the configuration parameters by using the Configure menu. These define: · The Dimensions of the CA Engine; · The number of Processes to handle the task; · The number of Folds into which the task is divided. The user can then build the executable by pressing the Build button. The output of the C compiler is shown to the user in a pop-up window.
Figure 3: Successful Build Pop-Up Window
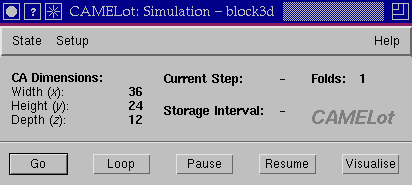
Running a ProgramThe Configure menu of the Development Window includes a menu by which the user can initialise the collection of statistics for the basic functions of the CA Engine. This should be enabled before clicking the Run button. After successful compilation and building the program, the user can invoke the executable by clicking the Run button. This pops up the Simulation Window which consists of three parts, a Menu bar, a Display part and a Button bar.
Figure 4: The Simulation Window The State menu contains an Initialise and a Save Option. The user may initialise a substate or the whole state of a CA using an existing file, or save the current status of the CA. The Setup menu allows the definition of the number of CA evolutions to be run as well as other more advanced features, which are described later in this section. The display part of the window contains information about the configuration of the CA and updates the current step when the CA is running. There are 5 buttons on this window. The Go and Loop buttons initialise the CA execution, the former for a number of steps defined from the Setup menu, the latter indefinitely (in fact for INT_MAX[1] steps). The Pause button temporarily suspends CA execution and allows visualisation window examination, state saving or editing etc. The user may continue the CA execution by clicking on the Resume button or restart the execution by clicking Go or Loop. The Visualise button allows the visualisation of a substate in various formats. The statistics for the functions of the system are output periodically during the run or after stopping the CA Engine execution, according to the users request.
Exiting CAMELotThe user may close the Simulation Window and terminate the CA Engine execution by selecting the Close Option of the State menu. In order to exit CAMELot the user must select the Exit option in the File menu of the Development window.
CAMELot Functionality OverviewThe CAMELot environment supports 3 different types of Windows. We will examine them in order of appearance when using the environment. Development WindowThe Development Window pops up when running CAMELot and, when it is closed, CAMELot exits. It consists of three parts, a Menu Bar, the CAMELot Editor and a 3-Button Bar. Menu BarThere are 4 pull-down menus.
Figure 5: The Development Window Menus. Note that the Configure Menu is greyed out since the screenshot was taken before compiling the file in the Editor. · File; · Edit; · Configure; · Help. FileThe File menu offers the following options: · Open a file; · Save a file; · Save a file As; · Load configuration; · Save Configuration; · Exit CAMELot.
The Open and Save As options pop up a window which allows the user to navigate through the filesystem and select the desired filename. For a file to be visible by Open, its name must have the extension .cpt. The Save option is only available if a filename has been specified for a file being edited. The Exit button exits CAMELot; the Delete button usually available on X Window titlebars is disabled for this window.
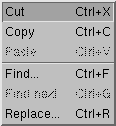
Figure 6: The File Menu The characteristics of the program which are set under the Configure menu of the Development Window are automatically saved in a file named progname.cnf, progname being the full pathname of the CARPET file, every time the users saves the CARPET file. They are automatically retrieved when the CARPET file is Opened. In addition to this automatic facility, the Save and Load Configuration options allow the user to explicitly save and retrieve the configuration of the model[2]. EditThe Edit menu contains the usual options. Keyboard short-cuts or accelerators (in brackets) are available for all options: · Cut (Ctrl-X); · Copy (Ctrl-C); · Paste (Ctrl-V); · Find (Ctrl-F); · Find next (Ctrl-G); · Replace (Ctrl-R).
Paste is only available after a Cut or Copy has been issued.
Figure 7: The Edit Menu
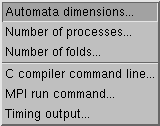
ConfigureThe Configure menu is made available after a successful compilation. It allows the user to modify the following parameters: · The Dimensions of the CA (x-Length, y-Height, z-Width); · The number of Processes to handle the task; · The number of Folds to which the CA is divided in the Length axis. · The C compiler pathname and flags; · The MPI run command; · The Timing output.
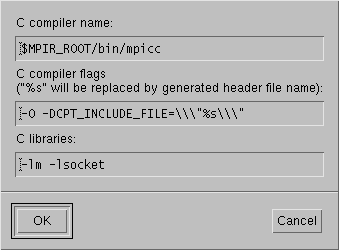
Figure 8: The Configure Menu It is worth noting that: · For best performance the Length of the CA must be an exact multiple of the product of the number of Processes with the number of Folds; · A 1-D CA has only the x axis available and a 2-D CA has only the x and y axes available. Controlling XDR OutputStarting from release 1.2 of CAMELot, XDR is used for the file I/O, this allows CAMELot data files to be portable between different machine architectures. The user can control the use of XDR through the use of the C compiler command line option of the Configure menu, shown in Figure 9.
Figure 9: The C compiler command line option pop-up menu · If the user wants to disable XDR for the operations related with reading from file, they should define -DNO_XDR_READ in the C compiler flags of the C compiler command line option pop-up menu; · If the user wants to disable XDR for the operations related with writing to file, they should define -DNO_XDR_WRITE.
The user can use this facility to translate native binary project or substate files to XDR by applying the following: · Load and compile the corresponding CARPET file; · Specify the appropriate dimensions and define -DNO_XDR_READ in the C compiler flags of the C compiler command line option pop-up menu, then build; · Click the Run button, load the configuration or substate files in question and then save them without running any iterations. Please refer to the following sections for information about the steps mentioned in the above discussion. Notes on Timing
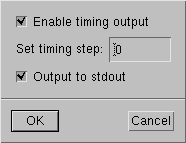
Figure 10: The Timer Configuration Menu
The CA Engine times its basic functions, namely the execution of the update statement, steering, visualisation, writing the system state on file and the total time spent excluding the time spent paused or stopped. The user can use the menu shown in Figure 10, which appears when the user clicks the Timing output option of the configure menu, to enable or disable the output of such results, set the period for printing them and direct the output to a file or the standard output of the terminal from which CAMELot was started. The format of the output is shown in Table 1.
Setting the timing step to zero results in the output being printed once after the CA Engine has been terminated (not at the end of the run). If the timing step is set to a value greater than zero, then the statistics are generated in the specified period. The time is accounted using double precision real numbers and is printed in floating-point representation in the standard C format (6 decimal digits), the measuring unit being seconds.
The Generations field contains the number of generations the output concerns. The field Calls counts the number of calls to each of the functions. Time is the total time taken for the calls in the Calls field. Best and Worst give the best and worst times for the function in question. The functions accounted are obvious. One remark is that after each iteration of the CA Engine, the read copy of the CA is updated by means of a memcpy call. Note that the time taken by this call is not accounted for by the Update Function timer. Sum gives the sum of the above times, whereas Total Execution Time counts the time total time taken, excluding the time spent paused or serving user requests. The Time field of Total can be less than the time shown in Sum, if the number of iterations is small, in which case the time taken for the initial boundary exchange is significant compared with the total execution time. This time is part of the Sum time but not part of Total.
Notes on Other SettingsThe following settings can be made using the -D pre-processor flag in the C compiler command line menu option:
· PROFILING: This directive enables gprof profiling output. Its use is explained in [Kavoussanakis et al. 1999]. It should be noted that in order for this flag to be effective, the MPI libraries must be compiled with the gprof compiling enabled. The appropriate flag must be set in the C compiler command line as well. · DEBUG: Provides assorted debugging messages · DEBUG_CALC_X_SIZES: Ditto for function calc_x_sizes() (section Errore. L'origine riferimento non è stata trovata.). · DEBUG_CMT_READ: Ditto for function cmt_read() (section Errore. L'origine riferimento non è stata trovata.). · DEBUG_CMT_WRITE: Ditto for function cmt_write() (section Errore. L'origine riferimento non è stata trovata.). · DEBUG_CMT_BOUNDARY_SWAP: Ditto for function cmt_boundary_swap() (section Errore. L'origine riferimento non è stata trovata.). · DEBUG_RUN: Ditto for function run() (section Errore. L'origine riferimento non è stata trovata.). · DEBUG_TX_VIS_PACK: Ditto for function tx_vis_pack() (section Errore. L'origine riferimento non è stata trovata.). · DEBUG_SERV_VIEW_STATE: Ditto for function serv_view_state() (section Errore. L'origine riferimento non è stata trovata.). · DEBUG_SERV_SET_STATE: Ditto for function serv_set_state() (section Errore. L'origine riferimento non è stata trovata.). · DEVELOP: More assorted messages; it was used in the initial stages of developing the program. · EVEN_DECOMP: Assumes that even decomposition of the model is possible. The effects of this are discussed extensively in sections Errore. L'origine riferimento non è stata trovata. and Errore. L'origine riferimento non è stata trovata. of this document. · HOMOGENEOUS: A non-portable performance optimisation which is discussed in section Errore. L'origine riferimento non è stata trovata..
1.2.1.1.4 HelpThe details of the product authors are available from the About CAMELot option of the Help menu.
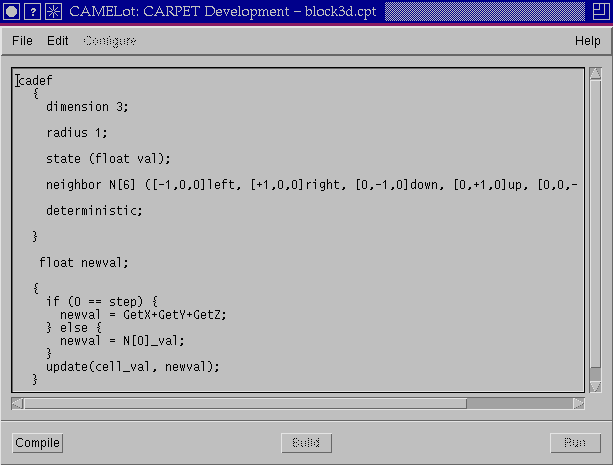
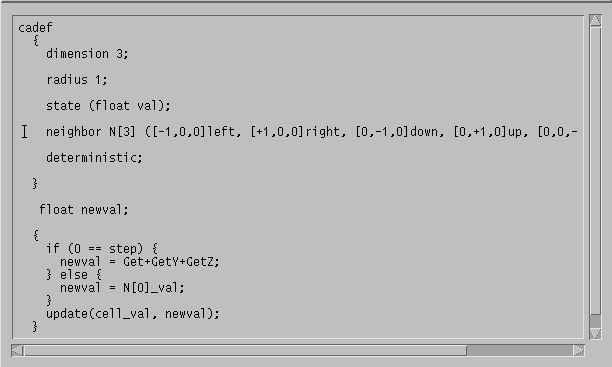
Figure 11: The Editor of the Development Window. Note the two errors, the dimension of the neighbor vector and the undefined Get directive which will be detected in the Compile and Build processes respectively. Editor WindowThe user may Open a file and use the Editor to view and modify it (Figure 11). If the file exceeds the length (80 characters) or the height (24 characters) of the window, the user may use the respective scrollbars or the keyboard arrow keys.
1.2.1.3 Button BarThe available buttons are:
· Compile; · Build; · Run.
Figure 12: The Button Bar of the Development Window. The only available button is compile since the screenshot was taken before compiling the file in the Editor and there was no configuration file available for this program. Compile This button compiles the current program in the Editor. This compilation checks for CARPET syntactic errors and generates the C source and header files for the specified CA model. The compiler handles both C (/* */) and C++ (//) style comments. A failed compilation is accompanied by a beep; a window is popped up containing the error messages and the cursor in the Editor is positioned at the first line reported to contain an error. If there is a beep but no error message is displayed then the automatic Save has failed.
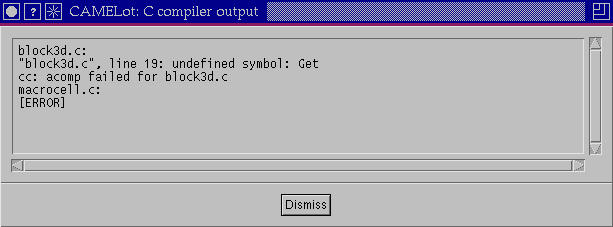
Figure 13: Error Message on the CARPET Compiler Output Window If a compilation fails, the Build and Run buttons as well as the Configure menu are unavailable to the user. N.B.: Clicking the Compile button in CAMELot 1.0 implicitly saved the CARPET file. This feature has been disabled in release 1.1 of the software to meet the users request. Build This button compiles and links the CA Engine code with the generated C source and header files for the CA. It invokes the C compiler specified in the Configure menu and redirects its output to the pop-up window generated. Starting from release 1.1 of the software, the pop-up window contains an [OK] or [ERROR] line at the end of the message generated by the compiler, to provide feedback about the status of the finished compilation. This is helpful, because if the compilation is successful, the UNIX C compiler cc(1) usually generates no messages. While the building of the program fails, the Run button is greyed out. Run This button spawns the CA Engine processes specified in the Configuration menu using the MPI run command as it appears in the respective option of the same menu. It also spawns the Simulation Window discussed next and makes the Build and Run buttons unavailable.
Figure 14: Error Message on the Build (C compiler) Output Window
Simulation WindowThe Simulation Window comprises · a Menu bar; · a Display subwindow; · a Button bar. Menu BarThe Menu Bar contains three menus: · State; · Setup; · Help.
Figure 15: The Menu Bar of the Simulation Window
State MenuThis allows the whole state or specific substates to be initialised or saved. The Close option closes the Simulation Window as well as all the Visualisation Windows and terminates the execution of the CA Engine.
A Substate can be saved in a binary file using the State-Save-Substate sequence of options. In order for the file to be subsequently detected as a substate file, it must be saved with the extension .cmt. Saving the Configuration involves saving status-specific data in a file with the extension .cpj, as well as all the substates in files with filenames constructed as follows: if the Configuration filename is cfn.cpj the substates are saved in filenames named cfn000.cmt, cfn001.cmt, etc.
Figure 16: The State Menu The data contained in a configuration file are: · The number of Dimensions; · The per-dimension Sizes; · The current Generation of the CA Engine; · The number of States; · The number of Folds; · The number of Global Parameters; · The values of the Global Parameters. Information stored in configuration or substate files can be loaded into the CA Engine using the State-Initialise options.
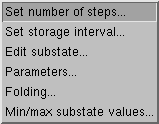
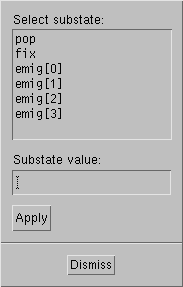
Setup MenuThe Setup Menu allows the following to be adjusted: · Steps to run the Engine; · Storage interval; · Substate editing (one cell); · Parameter editing; · Active Fold setting; · Manual setting of the per-substate minimum and maximum values for colour mapping.
Figure 17: The Setup Menu Storage Interval: Enables automatic CA Configuration saving with the set period. This involves saving the global parameters and other state variables in a binary file with the extension .prj and saving the substate data in files following the convention described earlier in the State Menu discussion. In addition to what stated there, the filename is prefixed with three characters denoting the sequence of the automatic save, starting with 000. If more than one thousand[3] consecutive automatic saves take place, the system overwrites the first without warning. In addition to the above, an AVS field file is saved for each substate datatype, for each invocation of the macrocell executable (not each run, the file stops being updated when the Simulation Window is closed). These contain information to be used by the post-processing tool which is based on AVS/Express. The format of the field files, based in the AVS description [AVS 1993] is shown in Table 2. To summarise the above, the following files are saved as a result of periodic configuration saves: · In each save, a project file with the extension .cpj; · In each save, a data file for each substate with the extension .cmt; · In each simulation, a field file for each substate datatype with the extension .fld.
For example, if the filename for the periodic configuration is fname and the system has three substates, two of which are of type char and one of type float, one periodic save will result to the following files being saved on disk:
000fname.cpj 000fname000.cmt 000fname001.cmt 000fname002.cmt fname_char.fld fname_float.fld
It should be noted that after choosing the filename for the Project save, the CA Engine generates a warning if this choice will lead to files already on disk being overwritten. If the program is not running in Batch mode (see section 0 for details), this warning is also displayed in a pop-up window. The user can change their preference by repeating the operation described above; otherwise, the saves will occur.
Figure 18: The Substate Editing Menu
Parameter Setting: Allows the adjustment of a global parameter. Parameters can be adjusted using the names they have in the program. The possible names are made available through a menu similar to the one shown in Figure 18. Active Fold Setting: Allows the definition of the first and last active fold. This implies that the active regions can only be considered contiguous. Folds are numbered from 0 to NFolds-1; illegal values are disallowed. Alternatively, the automatic inactive region detection mechanism implemented in CAMELot allows non-contiguous active regions and offers finer granularity. The mechanism is automatically activated if the CARPET program contains the statement deterministic and the user has not set the folds manually. Once deactivated, the automatic inactive region detection mechanism can be reactivated if the active folds are set to maximum range under the condition that the deterministic keyword exists in the CARPET program.
Figure 19: The Substate Selection Menu
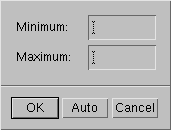
Manual setting of the per-substate minimum and maximum values for colour mapping: This option allows the user to override the automatic per-substate minimum and maximum calculation executed as part of the colour mapping strategy. Specifying the minimum and maximum enables visualising parts of the data with greater detail. This does not affect the evolution of the model, although it speeds up the visualisation process. The system reverts to the automatic mechanism if the users clicks on the Auto button of the menu (Figure 20).
Figure 20: Manual Per-Substate Minimum and Maximum Value Setting Menu
Display ScreenDisplays the current values of the following: · The Dimensions; · The Current Step of the CA Engine[7]; · The Periodic Storage Interval; · The number of Folds. N.B.: Folds: 1 indicates that no partitioning into multiple folds was done at compile time; i.e.. the CA is considered to consist of one single fold.
Figure 21: The Display Part of the Simulation Window Button Bar The available buttons are: · Go; · Loop; · Pause; · Resume; · Visualise.
Figure 22: The Button Bar of the Simulation Window
Go: Starts the CA Engine until the generation counter reaches the number of iterations specified in the corresponding Setup menu option. It can be interrupted by State or Setup menu options as well as pressing any other buttons on the Button Bar not including Resume. Loop: Same as Go except that it starts an infinite (INT_MAX iterations) CA evolution. Pause: Temporarily suspends CA Engine execution. This can be restarted with any of three buttons. · Go will restart the Engine until it reaches the specified number of iterations; · Loop will restart the Engine for infinite iterations; · Resume will continue the operation of the Engine from the step where it stopped. It will Loop if Loop was selected before Pause was pressed, or continue until the specified (possibly revised) finishing point is reached otherwise. Visualise: Allows the initialisation of a Visualisation window. The user is prompted to set the visualisation period and select the substate to be visualised. In the case of a 3-D model the user has to select one of the three available visualisation formats discussed in the Visualisation Window Section. N.B.: As of the release 1.1 of the software, Go and Loop no longer zero the iteration counter. Visualisation WindowThe Visualisation Window comprises two basic parts: · the Visualisation Space; · the Button Bar. Important information is also displayed in the title bar of the X window, namely the CARPET program filename, the Visualisation Step, the name of the visualised Substate, and the entity Coordinates. Visualisation SpaceThis occupies an area of 640x640 pixels (not including the colour palette bar area). The visualised entity is scaled so as to fit in the window. If the size (in cells) of the visualised entity is too big to represent each cell by at least one pixel, then the cells of the entity are sampled at regular spatial intervals. These sampled cells are drawn as single pixels. No averaging over the interval is performed. The user can resize the visualisation window. This is achieved by means of the corresponding facility of the users Window Manager. If the user decreases the visualisation space, scroll bars appear at the right-hand and bottom sides of the window. The default size of the window is the maximum; increasing the size further does not make the visualisation larger. However, it is meaningful for a decreased window to be enlarged at will, until it reaches its maximum size. This happens because resizing the window does not cause the visualised entity to be zoomed in or out, it only moves the borders of the window. The colour palette currently in use is shown as a horizontal bar at the bottom of the Visualisation Space of the window. The minimum and maximum values for the visualised substate are shown above this bar. The possible types of visualisation depend on the number of dimensions of the model: 1-D Models: The visualisation is drawn in horizontal lines from left to right. The vertical dimension of the window corresponds to time. The user can therefore see how the model changes with time. When the vertical dimension of the screen is exhausted, the visualisation restarts from the first line overwriting the first visualisation.
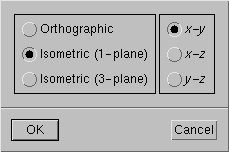
Figure 23: The Possible Types of Visualisation of a 3-D Model
3-D Models: x-y, x-z or y-z planes of a 3-D model can be displayed either as orthographic (as above) or isometric projections. The coordinate of the plane (i.e.. z value for an x-y plane, y value for a x-z plane etc) is specified by the user via a dialog box with scale widgets. In the orthographic case, x-y planes are displayed as above, x-z planes are displayed with a horizontal x-axis and vertical z-axis, and y-z planes are displayed with a vertical y-axis and horizontal z-axis. In the isometric case, the y-axis is oriented vertically, the x-axis is oriented upper-left to lower-right and the z-axis lower-left to upper-right.
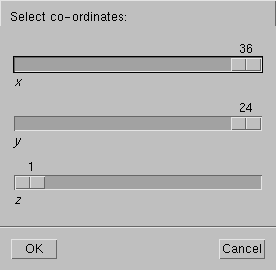
Figure 24: Plane Coordinate Dialog Box A 3-plane isometric view is available for 3-D models. In this case, an x-y, x-z and a y-z plane are selected by the user. If the coordinates of these planes are denoted z1, y1, and x1 respectively and the size of the CA in the z dimension is zmax then the x-y plane from x=0 to x=x1 and y=0 to y=y1, the x-z plane from x=0 to x=x1 and z=z1 to z=zmax and the y-z plane from y=0 to y=y1 and z=z1 to z=zmax are displayed as three faces of a cuboid with the axes oriented as for the 1-plane isometric case. The origin is thus the lower leftmost visible vertex, i.e.. a left-handed coordinate system is used.
From the above it can be deduced that in order to visualise a substate for the entire 3-D model, the user has to select the x and y coordinates to be equal to the maximum value for the x and y dimensions respectively and z=1 (x1=xmax, y1=ymax, z1=1), as shown in Figure 24. Button BarThis contains two buttons: · Colours; · Close. Colours: Allows the user to set the 256-colour palette to match their preference. The default is coloured from blue (lowest value) to red (highest value), the intermediate values mapped to cyan, green and yellow in ascending order. A monochrome (greyscale) palette ranging from black to white is also available. The files specifying the palette are stored with the extension .pal and contain 256 lines with 3 space-separated unsigned 16-bit hexadecimal values for Red, Green and Blue respectively, in each line. The colour in the first line is used for background. The palette selected is shown in the colour palette bar. Close: Closes the Visualisation Window; this does not affect the CA Engine execution. The user may also close the Window from the Delete button of the Window Manager. A screenshot of the Visualisation Window for the model in Figure 11 is shown in Figure 25.
Figure 25: The Visualisation Window. This is the output of the model in Figure 11 after 10 iterations of the CA Engine. Off-line CA Engine ExecutionThe CA Engine can be invoked outside the CAMELot environment. Limited functionality is supported. In the following discussion we assume that the user has built the CA executable either using the CAMELot environment or using the Makefile.batch makefile available with the distribution The command-line arguments available to the user are as follows: -l[8]<no_of_state> <filename>
Initialise substate <no_of_substate> from <filename>. This suggests that the user knows the substate index allocation done transparently in the CARPET parser. These indices can be deduced from the state CARPET statement, as they are parsed sequentially, i.e. the first substate given is indexed 0, the second 1 etc. -0 This initialises all substates to 0. -n<num_gens> Set the number of generations to be run to <num_gens>. -s<save_step> <filename> Enable periodic project save to files with basename <filename> (according to the conventions for saving a project) with period <save_step>. See section 1.2.2.1 for more details. -t<time_step> <filename> Enable periodic timing statistics output to file <filename> with period <time_step>. If <time_step> equals zero, then the results are output at the end of the simulation. If <filename> is set to -, then the results are written to the standard output of the terminal window where CAMELot was started. See section 1.2.1.1 for more details. <filename> Initialise the project from <filename>. This has no parameter to identify it and it must be the last argument. If -l or -0 have been specified it is ignored.
[1]
i.e [2] Note that the .cnf file format was extended in CAMELot 1.2. .cnf files saved by CAMELot 1.1 are not compatible with CAMELot 1.2. When opening a CARPET file in CAMELot 1.2 which has a corresponding .cnf file saved by CAMELot 1.1, immediately check the Configuration menu settings and use Save Configuration to overwrite the old .cnf file. [3] In CAMELot 1.0 this limit was set to 100 [4] This could differ from the number of actual saves if the user ends the run prematurely [5] The format of the label list is described in the discussion of function cmt_create_fld() in section Errore. L'origine riferimento non è stata trovata.. [6] Starting with release 1.3 of the software, the EOT separator appears between blocks of data refering to consecutive time steps [7] In the initial versions of the software this was available only if planes were visualised and only at the visualisation intervals. From release 1.1 this is available at all steps regardless of the existence of visualisation windows. [8] This is the letter el. No space exists between the l and the state index.
|


Last modified July 30, 2002. All rights reserved.